Peak Integration
This tutorial shows how to find peak maxima and determine peak areas with SpectroChemPy. As a prerequisite, the user is expected to have read the Import, Import IR, Slicing, and Baseline Correction tutorials.
First, let’s import the SpectroChemPy API.
[1]:
import spectrochempy as scp
Now, import some 2D data into an NDDataset object.
[2]:
ds = scp.read_omnic("irdata/nh4y-activation.spg")
ds
[2]:
NDDataset [nh4y-activation] — float64, shape: (y:55, x:5549), a.u.
Omnic filename: /home/runner/.spectrochempy/testdata/irdata/nh4y-activation.spg
2026-09-29 19:17:49+00:00> Sorted by date
Data
[ 2.033 2.037 ... 1.913 1.911]
...
[ 1.794 1.791 ... 1.198 1.198]
[ 1.816 1.815 ... 1.24 1.238]] a.u.
Dimension `x`
Dimension `y`
[ vz0466.spa, Wed Jul 06 21:00:38 2016 (GMT+02:00) vz0467.spa, Wed Jul 06 21:10:38 2016 (GMT+02:00) ...
vz0520.spa, Thu Jul 07 06:00:41 2016 (GMT+02:00) vz0521.spa, Thu Jul 07 06:10:41 2016 (GMT+02:00)]]
It’s a series of 55 spectra.
For the demonstration, select only the first 20 on a limited region from 1250 to 1800 cm\(^{-1}\) (Do not forget to use floating numbers for slicing).
[3]:
X = ds[:20, 1250.0:1800.0]
We can also eventually remove the offset on the acquisition time dimension (y).
[4]:
X.y -= X.y[0]
X.y.ito("min")
X.y.title = "acquisition time"
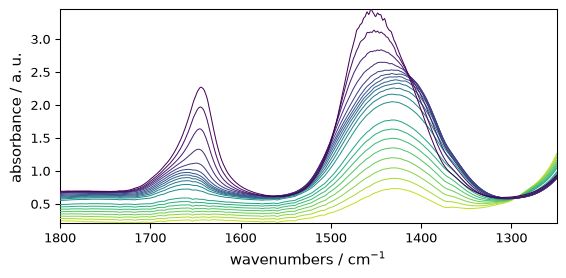
We set some plotting preferences and then plot the raw data.
[5]:
prefs = scp.preferences
prefs.figure.figsize = (6, 3)
prefs.colormap = "Dark2"
prefs.colorbar = True
_ = X.plot()
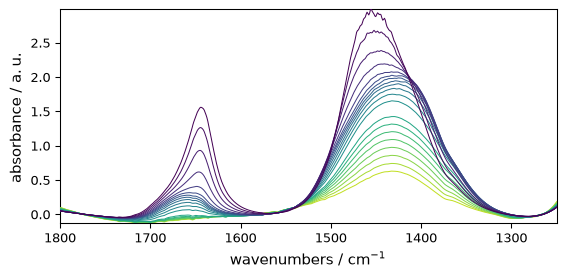
Now we can perform some baseline correction.
[6]:
blc = scp.Baseline()
blc.ranges = (
    [1740.0, 1800.0],
    [1550.0, 1570.0],
    [1250.0, 1300.0],
)  # define 3 regions where we want the baseline to reach zero.
blc.model = "polynomial"
blc.order = 3

_ = blc.fit(X)  # fit the baseline

Xcorr = blc.corrected  # get the corrected dataset
_ = Xcorr.plot()
To integrate each row on the full range, we can use the sum or trapz method of an NDDataset.
[7]:
inttrapz = Xcorr.trapezoid(dim="x")
intsimps = Xcorr.simpson(dim="x")
intsimps is a numerical integration. dataset.simpson(dim="x") and the equivalent top-level scp.simpson(dataset, dim="x") produce the same result. Do not confuse this integration function with scp.read_simpson(...), which reads SIMPSON NMR simulation data files — the two are unrelated operations that happen to share the “simpson” name.
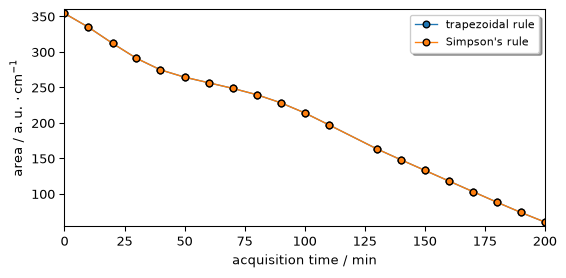
As you can see, both methods give almost the same results in this case.
[8]:
_ = scp.plot_multiple(
    method="scatter",
    ms=5,
    datasets=[inttrapz, intsimps],
    labels=["trapezoidal rule", "Simpson's rule"],
    legend="best",
)
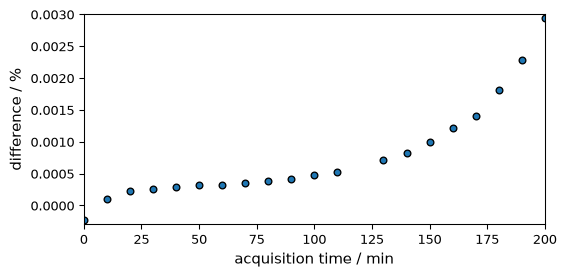
The difference between the trapezoidal and Simpson integration methods is visualized below. In this case, they are extremely close.
[9]:
diff = (inttrapz - intsimps) * 100.0 / intsimps
diff.title = "difference"
diff.units = "percent"
_ = diff.plot(scatter=True, ms=5)